View Shows
Click the “View Shows” button on the home page ribbon and choose Show Details or Show List to display your Shows in one of two ways.
The Show List page displays a list of shows in columns and rows much like a spreadsheet. Each column can be sorted and filtered.
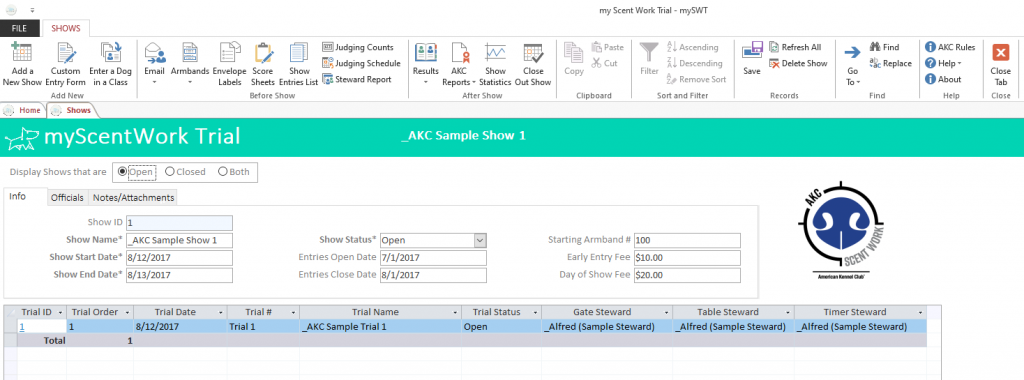
The Show Details page is divided into two parts. The upper part displays information for that show. The bottom part (Trials Datasheet) displays the trials that are a part of that show.
The first column on the Trials Datasheet is the Trial ID which is a unique Identifier automatically assigned by the system when the trial is created. This ID is a hyperlink and clicking on it will open the Trials page with that trial displayed. When navigating to a trial in this manner the open and closed filter mentioned below is disabled.
The logo on the right will be your club logo which is set on the Clubs page.
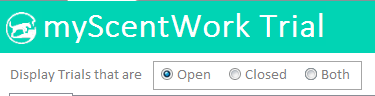
The page is initially filtered to display only Open Shows. Change the shows displayed by selecting one of the three radio buttons to display open shows, closed shows or both.
The Shows ribbon has buttons specific to mySWT Shows;
Add a New Show – This will add a new show to mySWT.
Custom Entry Form – This will create a custom entry form for this show which will only display the elements and classes you are offering. This option leaves the Dog and owner information blank, so it can be printed and completed by the owner. The email invitation option pre-fills the dog and owner information for exhibitors that are already in your database.
Enter a Dog in a Class – This will open the screen which allows you to enter a Dog in an available Class for this show.
Entries are made by selecting the Dog from the drop down list. This list contains 5 pieces of information which can be used to find the correct dog. It can be sorted by any of these pieces of information by selecting the appropriate radio button. When a sort order is selected it will become the first column in the drop down list. When a dog is selected their information will be shown in the gray boxes. This lets you know which dog you are working on.
You can type in the dropdown box to search for a dog. In the example below the drop down list is sorted by Call Name and typing the letter B will highlight the first dog with a Call Name that begins with B.
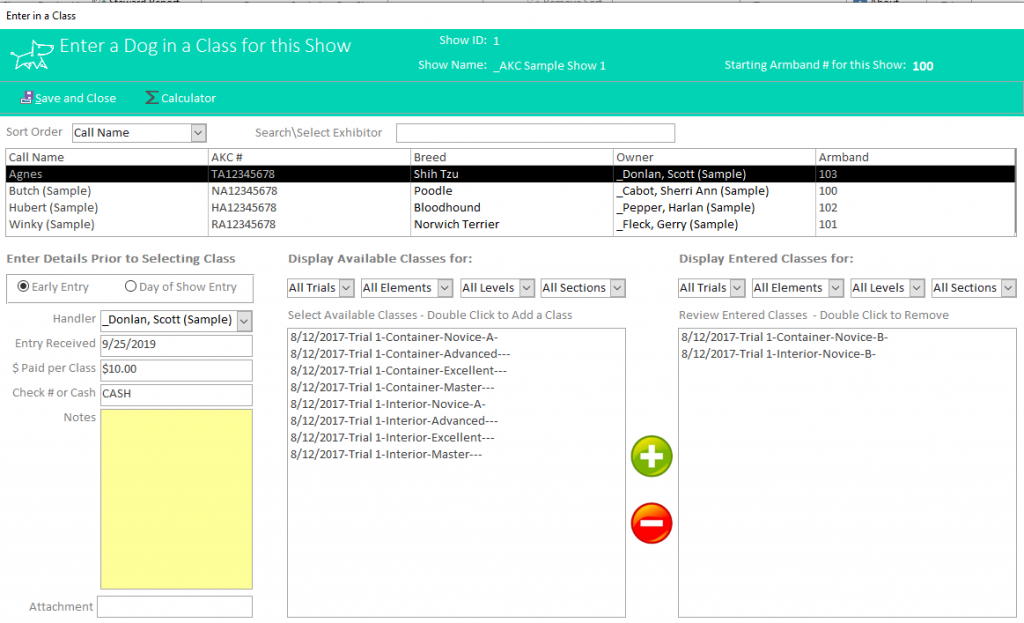
Armband numbers are assigned automatically for each Show starting with the number specified when creating the show when they are entered in the first Class. Exhibitors who have not yet been entered in a Class will have Armband number of zero.
All available Classes for this show are listed in the left list box. Available meaning Classes that are not closed out and the dog is not already entered in.
Double click or highlight and click the green plus sign to enter the selected dog in the Class. The Class will move from the available Classes to the Entered Classes in the list box on the right.
Double click or highlight and click the Red minus sign to remove a dog from a class, for example, because of a mistake or a move up.
Select Day of Show if this is a Day of Show entry prior to entering the dog in the Class.
Entry received defaults to today’s date, but can be changed.
The dollar amount paid per class is taken from what was entered when creating the Show. This can also be modified per entry.
You can also record the check #.
Email Invitation – This will email an invitation to all exhibitors in your database that you select with an invitation to attend your upcoming show. It creates the custom entry form mentioned above with their information pre-filled.
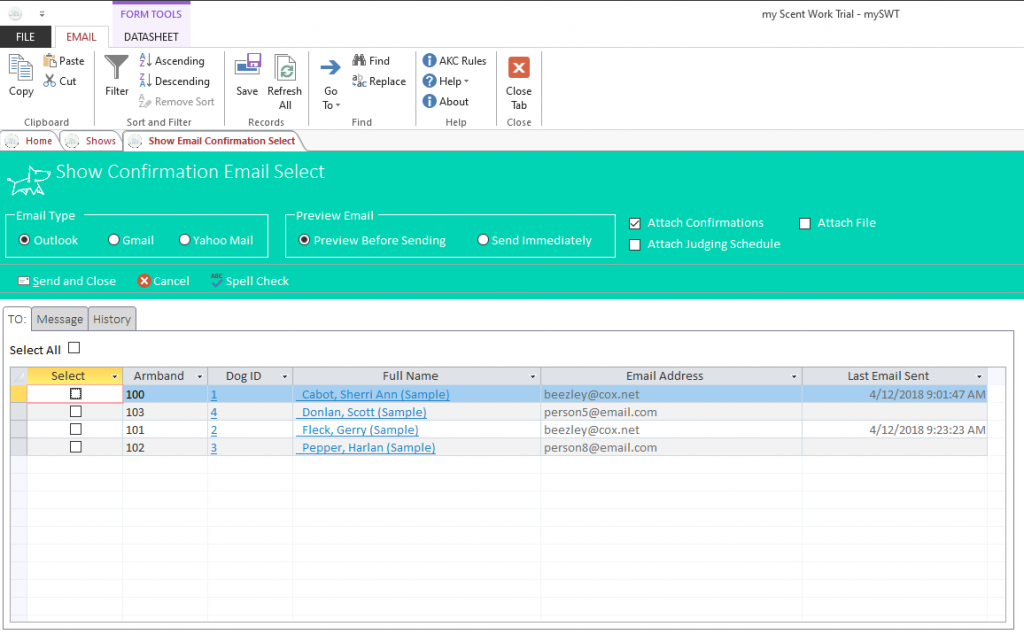
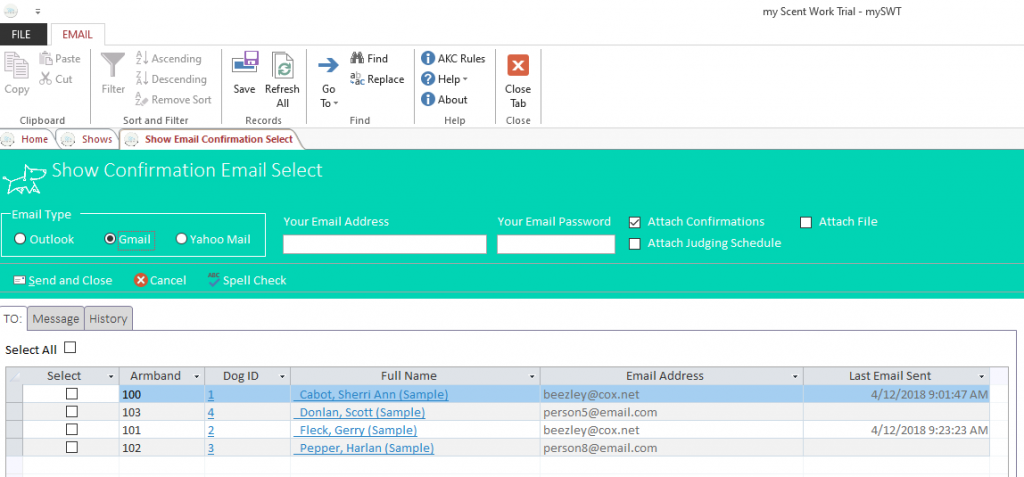
Email Confirmation – This will send an entry confirmation email to all exhibitors you select that are entered in this show. They receive the confirmation email as specified in the email template screen, an attachment showing the elements and classes they entered and the Judging Program report. You can also select to attach your Show Premium.
Email Results – This will send a results email to everyone that entered the Show with an attachment with their dog’s results.
You can select all or a specific person on the TO: tab.
The message tab is where you enter the subject and text of your email.
The history tab will display a summary of emails sent.
If you have Outlook installed on your PC as your email client you may send emails via Outlook. This is the preferred method and provides the advantage of being able to preview each email before it is sent.
Send Results to AKC – This will export the results in XML format and save the file in the reports folder. You can then choose to email this file to AKC. AKC can then import this file into their system. The email should be sent to er******@*kc.org Please include your club name, event date(s), and event number(s) in your email message.
If you do not have Outlook you may select either Gmail or Yahoo. You must provide the email address and password of your Gmail or Yahoo email accounts in order to send emails via these methods.
Gmail will also require that you select a setting in your account to allow external applications to send email. They state that you are enabling a less secure application.
Gmail does save the messages in the sent folder. Yahoo does not.
Armband Labels – This will print an armband label for each exhibitor of this show. A dialog box will open allowing you to choose if you want to print Early entries, Day of show entries, a specific armband number or entries entered into the system on a specifc date.. This allows you to print all of your armbands for Early entries a head of time and then print Day of Show armbands after Day of Show entries close.
You can also select to include the Dog’s name, Handler’s name, Trial Date and your club logo on each label.
If you have a partial sheet of labels you can select the number of label positions to skip.
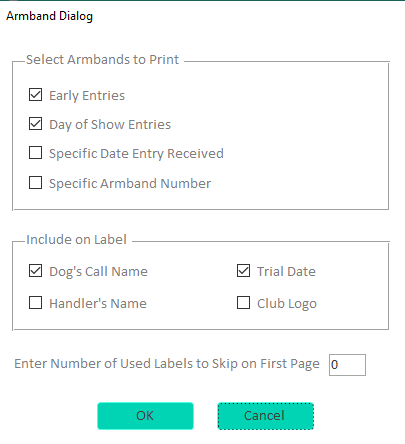
Armband labels can also be printed at the Trial and Class levels, but this is not recommended as labels could be duplicated. For example, an exhibitor entered more than one class. The labels are Avery (18262) 1 and 1/3”x 4” labels.
Envelope Labels – This will print a label with just the Handler’s name. The envelopes can be used to keep all of the armband labels for that handler together.
Score Sheets – This will print an AKC score sheet for each exhibitor entered in this show or the compact score sheet list. A dialog box will open allowing you to choose if you want to print all score sheets for this show or just score sheets for exhibitors that entered a class today (Day of Show Entries). This allows you to print all of your score sheets for pre-entries ahead of time and then print Day of Show score sheets after Day of Show entries close.
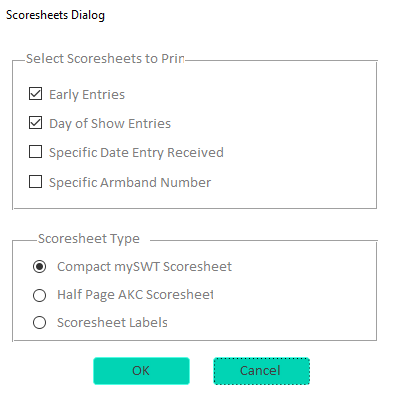
They can be used by the judge if they prefer keeping the score on paper or when entering the score immediately into mySWT is not feasible, such as in an exterior trial.
You can also print score sheet labels which can be attached to an official score sheet which contains the search area diagram.
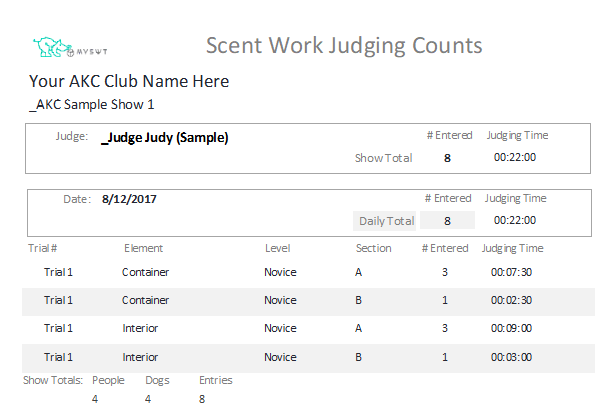
Judging Counts – This will open a report displaying which Classes each judge has been assigned to judge and how many exhibitors have entered each class and the judging time for that class. The report totals the number of Classes per day and for the entire show as well as the judging time. This is helpful in ensuring a judge is not exceeding the amount of time they are allowed to judge per day. This report can also be emailed to exhibitors when using the email confirmation option.
Show Judging Schedule – This is the show judging schedule which can be printed and displays each exhibitor grouped by trial, element, class and division. It can be printed in portrait or landscape view.
Results
Results Catalog – The Results Catalog is a report that can be printed and displays each class in this Show with each exhibitor’s results and placements.
Results Report – This report can be printed and posted for exhibitors
Result Labels – Result labels can be printed for each qualified exhibitor showing their results and placements. This can be attached to their qualifying ribbon. The labels are Avery (18262) 1 and 1/3”x 4” labels (same as Armband).
Send Results to AKC – This will export the results in XML format and save the file in the reports folder. You can then choose to email this file to AKC. AKC can then import this file into their system. The email should be sent to er******@*kc.org Please include your club name, event date(s), and event number(s) in your email message.
Show Statistics – This creates a report with some statistics for the entire show.
Close Out Show – This button will mark the status of the show as closed and will also close any open trials and Classes associated to this show that have not already been closed.
